Here’s a guide I wrote three years ago when I should have been writing essays for my classes. Classes that I eventually failed….. Anyway, I sure did put a lot of work into this!
I know this has some inaccuracies in the technical details. If you know the correct details, please point them out so I can correct this.
Getting Started with Emulation
By John Everett
March 2010
What is Emulation?
Emulation is the idea of being able to mimic something exactly by using different methods or materials. Advanced emulation can even enhance the experience beyond the original. A video game emulator is a computer program that seeks to effectively carry out all the functions of a console’s hardware and software using only computer software. Certain emulators, such as the
PlayStation 2 emulator found in early models of the
PlayStation 3 use the PS2’s
Emotion Engine chip to achieve combined hardware/software emulation, but I will cover only emulators which are purely software-based and non-commercial.
A Brief History of Emulators
Video Game Emulators first arose in the 1990s when commercial computers were becoming powerful enough to process the data required to run older consoles. Early emulators were incomplete and rife with bugs. A part of the difficulty of building an emulator is the trial and error nature of reverse engineering the console—a necessity since most companies did not publish their console’s specs.
In April of 1997 a breakthrough in the emulator community occurred with the release of
NESticle by Bloodlust Software. This
Nintendo Entertainment System emulator impressed with its unprecedented ease of use and high compatibility with NES games. After this the development of emulators rapidly increased and expanded. Today there exists at least one emulator for virtually every console, with varying degrees of accuracy, completion, and compatibility.
Legality of Emulators
Under
current rulings the only part of a video game console that is considered the intellectual property of its creator is the
BIOS file, without which it cannot run. It is legal to strip the BIOS file from the console and put into a computer (called dumping). It is also legal to make a copy of a video game (called ripping. The image is referred to as a
ROM for cartridges or
ISO for CDs and DVDs). As computers become more advanced the window of time between certain consoles and working emulation on commercial computers continually decreases.
Dolphin is able to emulate the current-generation
Nintendo Wii with limited success. Because of this companies often see unofficial emulators as a threat but no legal action can be taken. Instead, companies focus on
battling piracy so that emulators cannot be used for illegal activity.
Many old games can be played on current consoles after being purchased at their respective online stores. For example, one can buy and download
Excitebike for the NES on the
Nintendo Wii’s
Virtual Console then play it on the Wii. This officially sanctioned commercial emulation allows those not aware of emulation to experience it on their current console. The drawbacks of this are that once current consoles are replaced the data will have to be painstakingly transferred or repurchased. There is also no portability as the game is encoded to be read only by the current console and not by a computer. The perks a computer can offer, such as taking a screenshot or recording a video of one playing the game, are also not included. Being able to purchase a digital copy is relieving, though, since it is necessary to own a copy of a game in order to download it for use on an emulator and hard copies of certain games are becoming increasingly difficult to find. If for no other reason, I am glad that the option to buy an electronic copy of games exists; otherwise it would be impossible for every gamer to own a copy.
Difficulty of Building an Emulator
The first obstacle an emulator-builder comes across is reverse engineering a console to discover its specifications since accurate documentation usually does not exist. After this there is the Herculean task of emulating a console’s software and hardware with just computer software. Of course every computer has its own hardware such as video cards that the program can take advantage of, but the situation is almost never simple. Electronic parts do not compare 1-to-1 and a piece with a higher clock speed may be less powerful. Architecture is also a major factor.
The
Microsoft Xbox has an architecture very close to that of an
x86-based computer (i.e. most computers in existence including Apple computers) and an emulator for it is theoretically easier to code than a PS2 emulator, as the PS2 has architecture
substantially different from that of a computer. In addition, multiple chips running in sync is exceptionally difficult to emulate on a single core and, ironically, is more difficult to emulate on multiple-core processors since the PS2’s chips are tightly synchronized. The development team of
PCSX2 explains on their emulator’s
site the difficulties associated with emulating the PS2.
Even when all of this is gotten out of the way emulators still have to be able to work with games that support peripherals like
Sega Bass Fishing or
Donkey Konga. It must be found out whether the device can be substituted by the keyboard and mouse or if an actual peripheral must be obtained. Dolphin requires the use of actual Wii controllers and sensor bar to play Wii games. There are not yet any working emulators for the Nintendo DS so it is not known what challenges such an emulator would face with using the stylus and touch screen.
Importance of Emulators
It is no secret that machines break down as they age. Even the hardiest of equipment eventually crumbles into dust. And when companies manufacture better machines, they
stop making replacement parts for the old ones. The existence of emulators is paramount in the quest to preserve consoles electronically, and it is important that they be as accurate as possible so as to represent the original gameplay as closely as possible. No unofficial emulator produces an entirely accurate experience, and that is excusable, but I find it unsettling that their default settings do not even attempt to reproduce the visual aspects of a game properly. This is made all the more disturbing by the fact that even some commercial emulators like Microsoft’s
Game Room don’t offer visual accuracy. When setting up your emulators it will not be clear what elements are missing; I will attempt to ameliorate this. What I will focus on most is visual inaccuracy as everything else is usually a product of an incomplete emulator and therefore will be fixed as newer versions are released.
Visual Accuracy
One area in which most emulators fail is reproducing what a player would see when playing the real thing. Phosphorous bleeding, lingering, analog noise,
scan line separation, horizontal stretching, and a partially obscuring frame are all features a
CRT TV has that a modern
LCD screen does not. An excellent book called
Racing the Beam shows how connected the
Atari 2600 and the CRT TV were. Such a strong dependence means that when playing a game on a computer monitor the player does not see the game as it would have been seen in the 1970s. A Georgia Tech professor noticed this deficiency and asked five of his CS seniors to modify the Atari 2600 emulator
Stella to reproduce these effects.
Above: Enduro, 1983 by Activision.
In the screenshot of
Enduro above, the effects are shown applied in the right half of the screen. Note how the colors on the horizon bleed together, creating a much more convincing sunset than the flat areas of color on the left. Developers were aware of what effects the TV would have graphically and took advantage of it. The Georgia Tech team submitted their changes to the team who maintains Stella and the results were accepted. The
TV Effects can now be implemented in Stella’s settings. The Atari 2600 is the most extreme example since it interfaced with the TV in a unique and unusual way. Later consoles do not require as much consideration because of a lesser affinity, but do require considerations nonetheless, such as correct aspect ratio, scan lines, and TV frame.
A CRT TV’s display grid consists not of square pixels, but rectangular
color clocks. These color clocks horizontally stretch the
signal they receive. Let’s take the NES for example. The
NES has a standard resolution of 256 pixels by 240 pixels, with an aspect ratio of 8:7. But each color clock has an aspect ratio of 4:3 so the image is horizontally stretched when drawn on the TV screen.
Because the rectangular color clocks stretch the image the programmers have to take their pre-stretched dimensions into consideration. A shape that is perfectly square coming out of the NES will display as a rectangle on the TV. Because programmers drew their graphics with this in mind, it is important for the emulator to keep this in mind also.
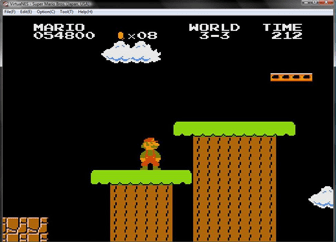
Above: Image stretched to TV-correct aspect, with scanlines
Below: Un-stretched image, without scanlines
In the screenshots of
Super Mario Bros. above we see the effect stretching has on the graphics. The squiggly lines running down the sides of the precipice appear only slightly crooked in the un-stretched image but in the stretched version the crookedness is far more pronounced. If viewed from two feet away the lines look like a zigzag-like pattern whereas the un-stretched lines look like an uneven mess from any distance. Luckily the emulator
VirtuaNES carries an option called “
TV Aspect Correct” under the Graphics Options folder. When the box is checked the aspect ratio remains locked in a 64:45 ratio, even when viewed in full screen mode.
When playing in VirtuaNES it is impossible not to notice several artifacts (meaning visual errors) on the edges of the screen, most noticeably the left. These glitches occur simply because they are not visible to a player on a TV; these edges are covered by the frame. The output resolution of the NES is 256 x 240. Eight pixels are covered on the top and bottom, while 8 8/15 pixels are covered on the left and right, creating an effective resolution of 238 14/15 x 224. (Color clocks stretch the image horizontally by 4/3, so 238 14/15 • 4/3 / 224 = 64/45 which gives us an aspect ratio of 64:45.) Take a look at the screenshots below and you’ll see why the inclusion of a frame is a good idea.
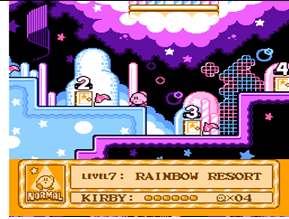
Above: Kirby’s Adventure 1993, by Rare (screen captured with VirtuaNES’ screenshot feature)
Below: Metroid 1986, by Nintendo R&D 1
A glance at the
Kirby screen should tell you that programmers were never expecting anyone to see the edges. There is a white bar going down the left and it changes colors during play depending on the background. There is a black bar across the top and a multi-colored bar across the bottom. Although there is no bar on the right edge, that does not mean artifacts do not occur there. In the
Metroid screen we see a Zeb flying away from Samus on the extreme right. Even though the screenshot does not show it, the Zeb is flickering. It does this because it is not actually on the screen—that is to say—its visibility is a mistake. The Zeb does not appear unless Samus is running in the same direction and once Samus stands still it disappears. The TV frame would cover the Zeb’s body so that it would not be visible to the player. VirtuaNES is the only emulator I have come across for any system that includes the superimposition of a false TV frame as an option. Even then the frame is not accurate as it does not cover the top and bottom eight pixels and is not wide enough on the sides. Still, the idea of the option is commendable.
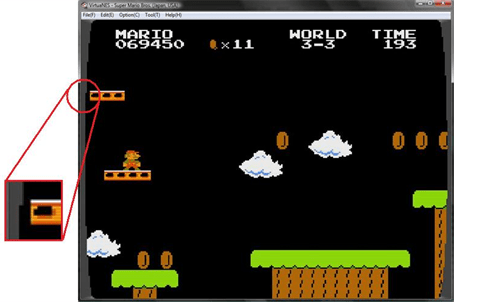
Notice that the far left platform is missing eight pixels on the left as it moves off screen.
The frame does not mask over this artifact completely.
A feature that most emulators do have, however, is the inclusion of false scan line separators. The scan line option places a series of thin grey lines horizontally across the screen to mimic the separation between a TV’s scan lines. The presence of this separation makes the screen as a whole darker, much in the same way that closely-spaced ink dots on paper seem like solid color from far enough away. Scan line separation can also help to smooth out pixelation to a certain degree, which would certainly have been welcome in the 8-bit generation when the 256 x 240 picture was inflated in order to fill up the TV screen.
Above: Batman 1990, by Sunsoft
Below: Final Fantasy 1987, by Square
In each of these screens the bottom half shows the scan line effect. As
Batman is already very dark the difference is subtle (if you look very closely, you’ll see that the top-right platform is brighter and less grey-tinted than the other two) but in
Final Fantasy the difference is much more noticeable. So what does all of this mean? It simply means that programmers would have made their games slightly brighter and less tinted knowing that the screen would be gray-ed over. The effect that the scan lines have on
Batman to give the platforms that last little bit of shading is simple yet elegant, and by its design ingenious. To not apply the scan line effect would be lose a part of the game’s visual tone. Incidentally, the screen of the
Game Boy Advance is
unintentionally dark so the games released for it had a
brighter palette to compensate. Luckily the GBA emulator
Visual Boy Advance contains the option to display these games with a duller palette to prevent a game that is entirely too bright when displayed on a well-lit monitor.
There is one emulator I found that incorporated every CRT TV effect exempting the TV frame. This is the
SNES emulator
snes9x. Piggybacking off Stella’s implementation of TV effects and going one step further by adding the scan line effect, snes9x offers an all-encompassing “TV Mode” option in its display settings. The results are stunning.
Above: Star Fox 1993, by Nintendo EAD and Argonaut Software
The left half of the screen shows TV Mode applied.
(Aspect Ratio is 7:5. Frame clipping changes to 4:3)
Although it was several years since I had played
Star Fox on a CRT TV, seeing the intro screen with this effect applied opened a floodgate of CRT-related memories. The visual accuracy is simply amazing. The letters don’t appear jagged, the stars appear as soft dots of light rather than glowing squares, and space isn’t a flat area of homogenous black. This is definitely a setting to keep. Luckily some other emulators are starting to make progress in this direction.
Gens has a scan line tweak just like VirtuaNES.
ePSXe does as well, though in practice it looks tacked on and fails to change the game’s look beyond the appearance of a couple hundred lines across the screen.
Now that it’s clear what visual effects are desirable, the table below outlines which popular emulators include them. The table’s purpose is simply to serve as personal edification and appreciation, and is not meant to be a deterrent to certain emulators. It’s just important to know whether or not the video is accurate.
|
Emulator
|
Console
|
Scan Line
|
TV-Correct Aspect Ratio
|
Frame
|
Ph. Bleed
|
|
|
|
No
|
No
|
No
|
No
|
|
Stella
|
Atari 2600
|
No
|
Yes
|
No
|
Yes
|
|
|
|
Yes
|
Yes (Selectable)
|
No
|
No
|
|
|
|
No
|
Yes (Manual)
|
No
|
No
|
|
|
|
No
|
No
|
No
|
No
|
|
|
|
No
|
Yes (Manual)
|
No
|
No
|
|
Virtua NES
|
Famicom
|
Yes
|
Yes (Selectable)
|
Yes
|
No
|
|
Dolphin
|
|
No*
|
Yes
|
No*
|
N/A
|
|
Dolphin
|
Wii
|
N/A
|
Yes
|
N/A
|
N/A
|
|
|
|
Yes
|
No
|
No
|
No
|
|
ePSXe
|
|
Yes
|
Yes (Selectable)
|
No
|
No
|
|
PCSX2
|
PlayStation 2
|
No
|
Yes (Manual)
|
No
|
No
|
|
Gens Plus!
|
|
Yes
|
Yes (Manual)
|
No
|
No
|
|
|
|
No
|
No
|
No
|
No
|
|
Gens Plus!
|
|
Yes
|
Yes (Manual)
|
No
|
No
|
|
|
|
No
|
Yes (Manual)
|
No
|
No
|
|
|
|
Yes
|
Yes (Manual)
|
No
|
No
|
|
Snes9x
|
Super Famicom
|
Yes
|
Yes (Manual)
|
No
|
Yes
|
|
|
Xbox
|
No
|
No
|
No
|
No
|
* The NGC includes 1:1 pixel mapping meaning that the TV would stretch pixels the same, but the image fed to the TV would be skinnier resulting in a 4:3 aspect ratio without frame clipping. Also, the NGC has a digital video out, meaning that it is not reliant upon the way a CRT displays an image. When displayed on an LCD the image does not lose integrity.
Acquiring Emulators
The emulators listed above are the best emulators of their respective console. To use an emulator you must first buy a console. Old consoles can be found online for very little if you’re lucky. It’s not necessary for the console to be working since you’re going to be using an emulator. To make things easier I recommend putting all of your emulators into one master folder. Once the console is in your possession you can dump the BIOS from the console onto your computer. There are multiple guides online about how to accomplish this, and there are also directories of backup BIOS files in case anything goes wrong.
Once the emulator is installed and the BIOS files referred to in the emulator’s directory, it’s important to take a few minutes to familiarize yourself with all of the options and controls; each emulator is unique and some features can take quite a while to figure out. The most-used feature with older games is state save, the ability to save a game from exactly where you are. Some emulators such as ePSXe have a setup that can become very involved. Not to worry though. I’ll guide you through the proper settings for those emulators to achieve the best settings.
Optimal Settings
These settings only reflect changes made to the defaults. Everything else should be left alone—at least at first, before you’re comfortable enough to fine-tune things. There should be a restore default button somewhere in the emulator in case you can’t remember what the defaults were.
Atari 2600: Stella-
Open the program and go to Options, Video Settings. Under “Renderer” choose OpenGL if your computer can support it. Close and reopen the program, then go back to Video Settings. Depending on your monitor’s resolution you’ll want to use Zoom on the TIA Filter. My resolution is 1440×900 and I chose 3x. TIA Palette, Standard; Timing, Sleep; GL Aspect (N) and (P), 100; Framerate, 0; Fullscreen, your choice; check GL VSync and Center Window. Now go to TV Effects.
As far as I can tell the following settings present the most accurate video: TV Color Texture, Normal; TV Color Bleed, High; TV Image Noise, Low; check TV Phosphor Burn-off box. Not every computer is the same so if you find more accurate effects feel free to change.
NES: VirtuaNES-
Under Options, Graphics: check TV Aspect Correct, No-Limit Sprites, left-screen clip, Fake TV mode (at 75%), Using Sleep, Sync drawing, and Display also except 4:3. Choose whatever your native resolution is. For the zoom I went with 3x but if you display in full screen it won’t matter. Click OK to accept the options, then go back in and disable TV Correct Aspect. Click OK and drag the right side of the program window until the display area inside the window has an aspect ratio of 4:3. When playing in full screen mode TV Correct Aspect Ratio is necessary. The image will be stretched too wide but it’s better than the original 16:15 ratio that would otherwise result.
PlayStation: ePSXe-
Choose the P.E. Op. S. Soft Driver 1.16. I like to choose fullscreen mode, but go with your preference. Under stretching: Scale to window size, keep aspect ratio; under dithering: depends on the speed of your video card. I choose the slowest option because mine can handle it. Under scan line mode: go with standard unless you have an nVidia card. If you’re not sure what type you have you can find it somewhere in the Control Panel. Finally, check the box that says Stop screen saver. For sound, go with P.E. Op. S. DSound Audio Driver to be consistent with your video plugin. You shouldn’t have to make any changes but come back if you do.
Sega CD: Gens Plus!-
Under Graphics, Render, I choose 2x with scan line. Click the box under Graphics that says stretch then pull the edges of the window until the area inside the window has a ratio of 21:15 or 1.4:1. Go to Options, Configuration, Files to direct the BIOS.
Acquiring Games
Once again, games can be found online or at a garage sale for a penny on the dollar. Once you have a game you can either rip the image from the medium or download the image from online.
www.emuparadise.org and
www.doperoms.com contain thousands of games to be downloaded. Cartridges are rather small and an entire collection of NES games might take up 20 megabytes, but when moving on to CDs that are used on the 3DO and PS, storage moves up into the gigabytes. The use of an external hard drive is recommended for storing copies of these games.
If you are new to retro gaming the concept of delving into the sea must be overwhelming indeed. After all, video gaming has a rich and diverse history, representing dozens of genres, hundreds of franchises, and thousands of adventures through a virtual world. To ease this burden I will share a list of games in my personal collection which I have been building upon my entire life. The full list appears in Appendix B but for the sake of space a shorter list appears below. This list is comprised of my Atari 2600 games and a few Nintendo games.
Atari 2600
|
Adventure
|
1979
|
Atari, inc.
|
Birthed the Action/Adventure Genre, first Easter Egg in a video game.
Featured in Racing the Beam.
|
|
Asteroids
|
1981
|
Atari, inc.
|
Adapted from the arcade game.
|
|
Frogger
|
1982
|
Prkr. Bros.
|
Adapted from the arcade game.
|
|
Kaboom!
|
1981
|
Activision
|
One of Activision’s signature games. Simple yet fun.
|
|
Pac-Man
|
1982
|
Atari, inc.
|
Showed the age of the Atari 2600. 12 million cartridges manufactured for 10 million consoles. Featured in Racing the Beam.
|
|
Pitfall!
|
1982
|
Activision
|
Helped Activision to become the first major third-party developer. Featured in Racing the Beam.
|
|
Pitfall II
|
1984
|
Activision
|
Featured a four-part harmony soundtrack made possible by addition of sound chip in cartridge.
|
|
Q*Bert
|
1982
|
Atari, inc.
|
Port of the classic arcade game.
|
|
River Raid
|
1982
|
Activision
|
Technically impressive due to large amount of terrain with limited memory. First game to be banned in Germany.
|
|
Space Invaders
|
1980
|
Atari, inc.
|
Port of arcade game; first official licensing of an arcade game. Quadrupled sales of Atari 2600. Led to shortage of ¥100 coins.
|
|
Star Wars: The Empire Strikes Back
|
1982
|
Prkr. Bros.
|
Pushed the envelope of what the Atari 2600’s sound chip was capable. First commercially successful game adaptation of a movie. (when ROM is loaded, go into Options, Game Properties, Display, and uncheck the Use Phosphor box)
|
|
E.T.: The Extra Terrestrial
|
1982
|
Atari, inc.
|
Almost single-handedly caused the video game crash of 1983. Showed Atari that brand loyalty only goes so far. Disrespected gaming by treating games like movie tie-ins instead of art.
|
|
Yar’s Revenge
|
1981
|
Atari, inc.
|
Began as licensed port of Star Castle but took on life of its own. Represents game’s source code as visual data (the neutral zone). Featured in Racing the Beam.
|
NES
|
Adventures of Lolo
|
1989
|
HAL
|
Based on Japanese Eggerland series.
|
|
Bionic Commando
|
1988
|
Capcom
|
Player must use grappling arm to traverse gaps; one of very few platformers where player cannot jump.
|
|
Castlevania
|
1986
|
Konami
|
End bosses are inspired by myth and literature.
|
|
DuckTales
|
1989
|
Capcom
|
Based on Disney’s cartoon series of same name. Notable for being a licensed game of high quality.
|
|
Excitebike
|
1984
|
N. R&D1
|
Includes feature to create custom tracks.
|
|
Faxanadu
|
1987
|
Hudson
|
Contains unusual earthy palette with haunting music.
|
|
Gradius
|
1985
|
Konami
|
Popularized “power meter” used to upgrade weapons.
|
|
Ice Climber
|
1985
|
N. R&D1
|
Popo and Nana appear in the Super Smash Bros. series.
|
|
Journey to Silius
|
1990
|
Sunsoft
|
Originally a Terminator license. Noted for very strong music, unusual style for the NES. Thick timbre.
|
|
Kid Icarus: Angel Land Story
|
1987
|
N. R&D1
|
Contains same game engine as Metroid. Combines elements of Metroid, Super Mario Bros, and Zelda.
|
|
Legendary Wings
|
1988
|
Capcom
|
Port of the arcade game made in 1986.
|
|
Mother (JP)
|
1989
|
Nintendo
|
Unique for being a JRPG with modern setting. English ROM exists by name of EarthBound Zero.
|
|
Ninja Gaiden
|
1988
|
Tecmo
|
Eventually updated on the SNES.
|
|
Power Blade
|
1991
|
Natsume
|
Reworked adaptation of Power Blazer. Character made into Arnold Schwarzenegger look-alike.
|
|
Qix
|
1990
|
Taito
|
Port of popular arcade strategy game from 1981
|
|
Rad Racer
|
1987
|
Square
|
Answer to Sega’s OutRun. Included 3D glasses.
|
|
Super Mario Bros. 3
|
1988
|
N. R&D4
|
Best-selling non-pack-in game for NES.
|
|
TwinBee
|
1986
|
Konami
|
Port of arcade shoot ‘em up. Two players playing simultaneously can perform more powerful attacks.
|
|
Vice: Project Doom
|
1991
|
Aicom
|
Action game containing several genres.
|
|
Wizards and Warriors
|
1987
|
Rare
|
Challenging gameplay offset by unlimited continues and a light penalty in the form of a reset score.
|
|
Zelda II: The Adventure of Link
|
1987
|
Nintendo
EAD
|
Like Super Mario Bros. 2, Zelda II bears little resemblance to either its predecessor or successor. Link gains XP and fights in a more complex combat system.
|
These two lists represent a wide variety of genres and gameplay styles, as well as several iconic characters that are to video games as Bela Lugosi’s Dracula is to movies. If there are no copies of a certain game to be found at an online auction, and you have a Wii, check the Virtual Console for a downloadable game. As long as you possess the game, whether physical or digital, downloading one copy online is legal since it is considered a back-up copy.
Controller Input
What good is a game if you can’t control it? Every emulator allows control via the keyboard but there is no replacement for a genuine controller—or one close to it, anyway. There are two methods when it comes to controller input. The first method is to obtain an
adapter which a controller plugs into. Some adapters allow
third-party and aftermarket controllers while some are finicky and require official first-party controllers. Be certain of what your adapter requires. The second method is to find a
specially constructed unofficial controller that plugs directly into the computer through a USB port. Some such controllers are actually authentic controllers with the original output
cord removed and replaced with a USB cord. I do not recommend this method because I consider the replacement of the cord to be mutilation of an irreplaceable controller. Go with an
adapter or an unofficial USB controller.
Be sure to read the reviews of any product before you buy it. The voice of experience knows that otherwise you’ll end up buying a dud that no one else will want to take off your hands. The Tomee line of controllers seems to be top-notch. The Start and Select buttons on the SNES USB controller are made of plastic instead of rubber, but other than that these unofficial controllers look very close to the original. The price may seem a little steep but the investment is well worth it.
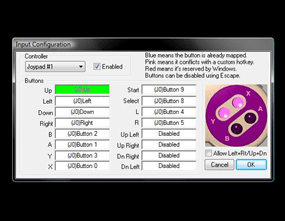
To sync the controller up to the emulator, go to the Input tab and bring up the prompt.
Above: snes9x
Below: Gens+
To set the key, click on each button’s prompt and press the corresponding button on the controller. Unfortunately the diagonals don’t seem to calibrate properly on the Tomee SNES controllers but this deficiency doesn’t seem to detract from the controllability beyond making flight difficult in
Super Mario World. With ePSXe I am not sure if the problem lies with my PS Controller adapter, but I found that calibrating the input requires a certain tactic. The prompt screen is under Config, Game Pad, Port 1, Pad 1. Click on each prompt and hold down the button. Keep holding down the button until you click on the next prompt. Now release and repeat the process until all buttons are accounted for. Keep in mind that the prompts at the bottom of each column are for L3 and R3. They require you to depress the analog stick until it clicks. When holding down the button on the last prompt, click one of the dropdown boxes around the edges. Now let go of the button on the controller and click outside the box. Calibration is now complete. You may find that you need to make an adjustment to the force feedback (which allows vibration) in which case the settings are in the dropdown boxes to the right.
Good Luck
Welcome to the emulation scene, cadet. You are now free to revisit old games that have long since faded away in your memory and to experience other games for the first time. If you like what you see consider making a donation to the teams who volunteer their time and energy in order to improve their emulators. Some emulators are defunct but others are actively being updated and any amount would let these artists know how much their work is appreciated. If nothing else your donation could go toward covering the cost of maintaining the website. Below are some of the emulators which are still being worked on.
PCSX2 (PS2) – Donation button is on the bottom-left corner.
Dolphin (GC and Wii) – Don’t accept donations. Programming contributions are welcome.
Project 64 (N64) – Create user account and upgrade. Donation will take place then.
Cxbx (Xbox) – A PayPal account can transfer to any email address.
Stella (Atari 2600) – This page contains several email addresses; the possibilities are endless!
Any support you can give will definitely be appreciated, even if it’s something as simple as creating an account. The growing number of a project’s supporters can really have an impact on a team’s motivation. This motivation is necessary for a team to want to keep going, especially when the console in question is very difficult to emulate by nature. Please help these teams keep going to produce better and better emulators so that later generations will still be able to play classic games long after the consoles they were made for stop working. And in the meantime, have fun.
Appendix A- Cheats
Metroid is difficult. The Legend of Zelda is grueling. Contra is nigh impossible without using the now famous Konami Code (↑ ↑ ↓ ↓ ← → ← → B A, followed by Start to apply it). Older games in general tend to have a higher difficulty level, I’m guessing, so that the player would feel like he got the most out of his money. As the eighties started to draw to a close, however, developers began to ease up on the difficulty settings. Not only were the hardcore games inaccessible to non-proficient gamers, but even members of the hardcore audience must have grown weary of the frustration that comes along with an unbeatable piece of software.
Although newer games succeeded in being easier, the older games did not change with them. A lot of contemporary players, especially those who are young or less skilled, may feel alienated by this high difficulty level. Happily, though, there is a solution. That solution lies in GameGenie and Gameshark, two hacking devices supported by many emulators. VirtuaNES will be used to demonstrate this feature. The first thing that must be done is to create a cheat file.
Cheat codes can be found online, with the best places to look being GameShark’s and GameGenie’s official websites. Cheats can also be engineered using VirtuaNES’ built-in tools but this option is for advance gamers only. When a cheat is found, copy and paste it into a Notepad document with the following format:
;Final Fantasy Game Genie Codes
;
;Start with 800 Gold
LAOUIAPA
;
;Double Fighter Evade
;ZTKUPAIU
;
;Double Red Mage Evade
GYNUPEZL
;
;Double White Mage Evade
ZVEUPAIU
;
;Double Black Mage Evade
GNOUPEZL
;
Place a semicolon as the first character of every line except for the line which holds the code itself. These lines will be ignored by the program but can still be read by human eyes whenever the document is opened. Note that the Double Fighter Evade in the example above is disabled via a semicolon in front. It is disabled because it makes the difficulty too low for the game to be engaging. After typing in all the desired cheats, save the file inside the emulator’s folder named “CheatCode.” Now open VirtuaNES. Open Final Fantasy. Before pressing anything, immediately go over to the Tool bar and click GameGenie under it. Above the Open button there is a dropdown menu that allows you to choose from All Files. Select it and the text document will now be selectable. After clicking Open, go to Tool and select Cheat enable. You can now start the game with cheats enabled.
<< Frogger Kaboom >>